


Doggie door
High quality door. Looks very nice in newly remodeled basement!
The MaxSeal Wall Model pet door is available in dual or single flap versions. The dual flap model is recommended for customers seeking an ultimate weather barrier for their home. Single flap models are commonly used in scenarios where an insulating barrier is not required. All Security Boss products are hand built to order. The MaxSeal pet doors are the best sealing & insulating doors, as well as, the most secure when locked off. We often remark that the MaxSeal is the only door we would feel comfortable with in our home if we were on vacation, or away from home for any length of time. If you have had experience with any other pet door in the past, you will quickly see that the superior performing MaxSeal will pay for itself in energy savings, while providing the most security.
Only the finest materials are used in the manufacture of the MaxSeal doors by Security Boss Manufacturing LLC. This craftsmanship is backed up with a limited lifetime warranty. MaxSeals are designed to be maintained forever. This is the last pet door you will need to purchase for your dog. All components are manufactured so that the customer can easily replace, upgrade, or maintain all the main components. The structural integrity of the door and security panel are protected under warranty so that you will always have a superior performing product for the life of your pet.
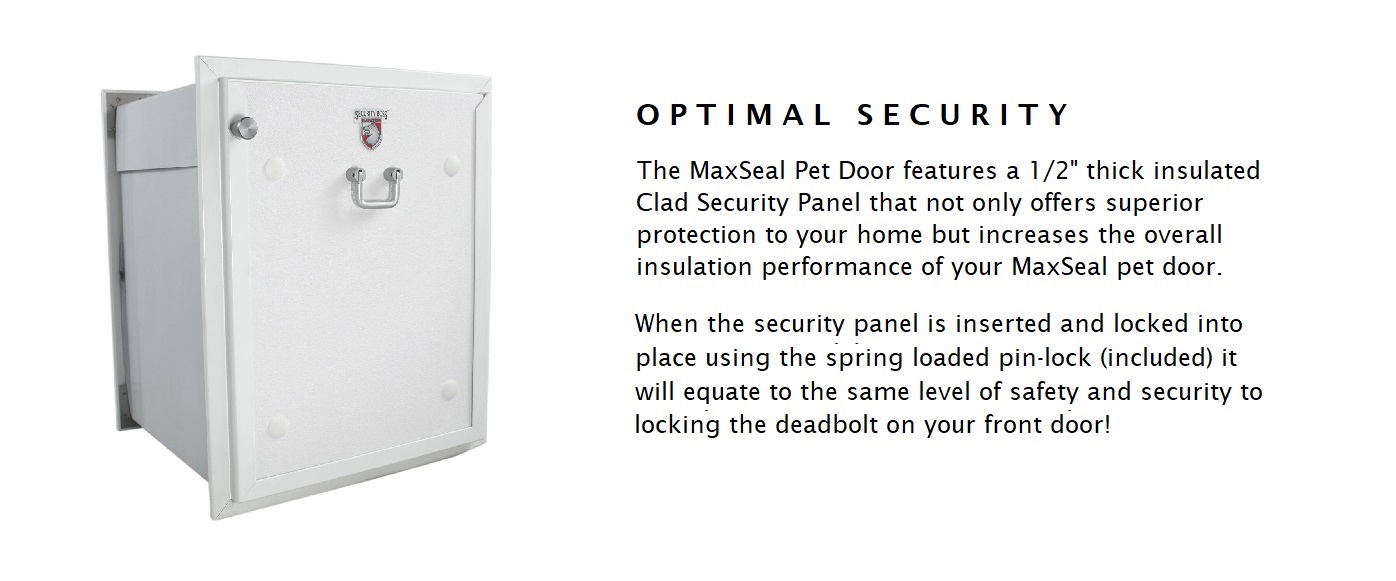
(All security panels come in white)


| Flap Size WxH (inches) |
Minimum Rough-Cut Cut in Door (wxh) |
Exterior Frame (overall frame size) (w x h) |
Single Flap Model |
Dual Flap Model |
| Small 6"x 7 1/2" |
8 1/8" x 9 5/16" | 9 3/8 x 10 9/16" | 255.50 | 274.90 |
| Small/Medium 7"x 9" |
9 1/8" x 10 13/16" | 10 3/8 x 12 1/16" | 275.71 | 320.91 |
| Medium 9" x 12" |
11 1/8" x 13 13/16" | 12 3/8 x 15 1/16" | 342.38 | 388.71 |
| Large 11" x 16" |
13 1/8" x 17 13/16" | 14 3/8 x 19 1/16" | 413.57 | 470.07 |
| Tall 11" x 20" |
13 1/8" x 21 13/16" | 14 3/8 x 23 1/16 | 502.84 | 541.26 |
| Tall Grand 11" x 25" |
13 1/8" x 26 13/16" | 14 3/8 x 28 1/16" | 534.48 | 612.45 |
| XL Grand 12" x 24" |
14 1/8" x 25 13/16" | 15 3/8 x 27 1/16" | 583.07 | 661.04 |
| Wide Tall 15" x 20" |
17 1/8" x 21 13/16" | 18 3/8 x 23 1/16" | 636.18 | 722.06 |
| Mammoth 15" x 24" |
17 1/8" x 25 13/16 | 18 3/8 x 27 1/16 | 680.25 | 758.22 |
| Behemoth 15 3/4" x 32" |
17 7/8" x 33 13/16" | 19 1/8 x 35 1/16" | 736.75 | 840.71 |
The MaxSeal Wall Model pet door is available in dual or single flap versions. The dual flap model is recommended for customers seeking an ultimate weather barrier for their home. Single flap models are commonly used in scenarios where an insulating barrier is not required. All Security Boss products are hand built to order.

The MaxSeal pet doors are the best sealing & insulating doors, as well as, the most secure when locked off. We often remark that the MaxSeal is the only door we would feel comfortable with in our home if we were on vacation, or away from home for any length of time. If you have had experience with any other pet door in the past, you will quickly see that the superior performing MaxSeal will pay for itself in energy savings, while providing the most security.
Only the finest materials are used in the manufacture of the MaxSeal doors by Security Boss Manufacturing LLC. This craftsmanship is backed up with a limited lifetime warranty. MaxSeals are designed to be maintained forever. This is the last pet door you will need to purchase for your dog. All components are manufactured so that the customer can easily replace, upgrade, or maintain all the main components. The structural integrity of the door and security panel are protected under warranty so that you will always have a superior performing product for the life of your pet.
We suggest that when pre-cutting the rough for any pet door, that you add at least an 1/8" to the width and height to allow for easy fitting. Some Rough cuts are more precise and may fit tighter if the hole is not completely true.We always recommend that the door is on hand prior to cutting. We will not be responsible for re-fitting after the fact.
Doors are refundable within 30 days of receipt by customer
No pet door is rain proof. Please consider the location where you plan to install your pet door and the severity of the weather the pet door would be exposed to.

Tools You May Need:
Pliers
Flat tipped screw driver
Scissors or snips
Utility knife
Silicone Sealant
Step 1: Be sure that you have ordered the correct size door for your pet. For long term use it is best to size the pet door so that the top of the door is about 2 inches taller than your pet's shoulders. The resulting bottom of the opening should be a comfortable step over height.
Step 2: Check the package you received to make sure that it contains all the necessary parts.
Complete Kit includes:
Instructions
MaxSeal wall model (includes inner frame with attached tunnel and outer frame)
Indoor Outdoor carpet
Insulated Security Panel with replacement rivets
1-1/4 inch #6 Phillips Head Screws
1-1/4 inch #6 Security Screws for Tamper proof installations
7/64 inch drill bit
Allen Wrench
Tools You May Need:
Tools you may need: (will vary depending on the type of wall where you install the pet door)
Circular saw with wood or masonry blade
Drywall saw or jigsaw
Electric drill
5/16 inch masonry bit (if installing in concrete)
level
Masking tape
Caulk
Tin snips
Stud finder
Tape Measure
Philips head screw driver
Standard head screw driver (for Security Screws)
Step 3: Find a suitable area for your wall model. Wall models have an Insulated security panel that lift out vertically (side loaded panel models are available as needed). Make sure there is enough room to remove this Panel. To install in a framed wall, place the door between studs. Mark the stud locations and position the door between the studs. Check both sides of the wall to make sure the area you cut is free of wiring and plumbing.
Step 4: Position the MaxSeal tunnel against the interior wall. Trace the perimeter of the tunnel upon the wall. Check the dimension of the wall marking against the measurements of the tunnel. Make sure your opening is square and level.
(We recommend that you use the rough-cut information below as sometimes the outer perimeter of the tunnel can vary. You may also make a template with the rough-cut information for your size pet door, then trace from the template on the wall).
Rough-Cut Dimensions
Based on door sizes |
|
|
Size |
Rough Cut Required |
|
|
8 1/8x 9 5/16 |
|
|
9 1/8x 10 13/16 |
|
|
11 1/8 x 13 13/16 |
|
|
13 1/8x 17 13/16 |
|
|
13 1/8x 21 13/16 |
|
|
13 1/8x 26 13/16 |
|
|
14 1'/8x 25 13/16 |
|
|
17 1/8x 21 13/16 |
|
|
17 1/8x 25 13/16 |
|
|
17 7/8 x 33 13/16 |
|
The above measurements are exact dimensions, you may add slightly depending on the accuracy of your cut. |
|
Step 5: Cut a small hole near the center of the traced outline in step 4. Look for obstructions within the wall. The smaller the opening the easier the repair should obstructions be found. Use your hand to feel for any obstructions that may not have been seen.
Step 6: If there are no obstructions then cut the inside wall on the lines traced in step 4. Use a drywall saw or utility knife. Once the interior lines have been completely cut, remove the drywall and insulation from the opening.
Step 7: At each corner of the cutout, use a long drill bit to drill through the exterior fascia. Use a Masonry bit for stucco or stone exterior construction.
Step 8: On the exterior wall, find the corner holes you drilled in Step 7 and draw your tunnel outline on the wall. Make sure your opening is square and level.
Step 9: Drill two additional holes at each corner that are on the tunnel outline. Elongate these holes so you can insert a reciprocating saw blade.
Step 10: Use a reciprocating saw to complete the exterior cutout of the opening.
Step 11: Place the inside frame with attached tunnel through the wall cutout. From the outside, hold the inside frame tight against the wall by reaching through the door opening. Mark the tunnel with a marker along the outside wall.
Step 12: Remove the interior door frame and tunnel from the hole. Cut the tunnel along the marked lines in step 11 with tin snips to make the tunnel fit your wall thickness.
Step 13: Insert the inside frame and tunnel back into the opening. From the exterior, Sleeve the outside frame into the tunnel. Use the supplied drill bit to drill through the pre-drilled holes into the tunnel. Insert supplied screws into the drilled holes. The number of side screws varies with the size of pet door. (Security Boss Manufacturing has included One-Way Security Screws as well as Philips head screws to give customers a Tamper-proof option in their door installation.)
Step 14: Caulk between the outside frame and the outside wall at the top and both sides. DO NOT CAULK AT THE BOTTOM OF THE OUTSIDE FRAME. This will restrict the drainage of moisture from inside the door.
Step 15: Measure the width of the tunnel between the door frames and cut the included carpet to the correct width and length to cover the distance between the door frames. To keep the carpet in place use silicone adhesive. Press the carpet into the bottom of the tunnel first, then attach it to the sides of the tunnel.
Step 16: Use window cleaner and a soft towel to remove any fingerprints from the interior or exterior flaps
General Use Information: The Insulated Security panel will slide into place and fasten with the dead bolt lock. When removing the Security panel from the unit, apply a slight inward pull to the panel handle while lifting. Since the panel is tight fitting in the channel, this pulling pressure will ensure that the panel rivets do not catch on the frame of the unit.
The dead bolt is retracted by pulling on the handle and turning the handle Clockwise, or Right, approximately a quarter of a turn. To lock the deadbolt, continue to turn the handle of the deadbolt another quarter turn and the lock will extend into the locked position under spring tension. DO NOT TURN THE HANDLE OF THE LOCK COUNTER CLOCK WISE OR LEFT, AS THE LOCK WILL LOOSEN AND NOT WORK.
MAINTENANCE:
Replacement rivets have been included with your hardware kit should the ones on the MaxSeal Insulated Security panel work loose. Install by pressing the two pieces together from opposite sides of the panel in the pre-drilled holes. The Thumbscrews that attach the flaps are factory tightened. Through use, the thumbscrews occasionally loosen and therefore should be checked regularly for tightness. Re-tighten the thumbscrews using the included Allen wrench.
The magnets on all MaxSeal doors are adjustable. This allows a precise seal no matter the weather or size of the flap throughout the years. The magnets are positioned in the frame with a pressure fit. The Magnet is held by an aluminum carrier that can slide in and out of the painted frame rail. The best way to lift the magnet is by using pliers to lift the magnet out of the frame rail. BE SURE TO COVER THE MAGNET AND CARRIER WITH A TOWEL TO PREVENT SCRATCHING OF THE FRAME AND CARRIER. Only lift the magnet the minimum required to make the magnet touch the strike plate on the flap. If the Magnet Carrier becomes loose within the frame after adjustment, simply pry the two legs of the magnet apart and reinsert into the frame rail. The magnets are adjusted correctly when there is no airspace between the magnet and the strike plate. Once the magnets are positioned properly, your replacement flaps is installed.

MaxSeal® Door Mount Pet Doors Superior Sealing / Insulating, Security Pet Door by Security Boss Manufacturing LLC The MaxSeal® Door Model pet door is available in dual or single flap versions..…

MaxSeal® PRO Pet Door Best Insulating Dog Door for Walls Most Secure Pet Door | Durable Hinged Flaps WHATS A